Build, assemble and erect a garden shed in 7 simple steps!
Find out how to build and erect a garden shed. This step by step will guide will help you assemble your garden shed in 7 simple steps!
1) Prepare a level base. If the shed is to go on a concrete, paved or tarmacadam base, simply lay out the 2”x1½” timber bearers in parallel rows where the shed is to go. These should be parallel to the front of the shed and approx. 18” apart. If the shed is on an area where there is grass or clay, lay out 4” solid concrete blocks in rows and lay the timber bearers on these. Make sure bearers are level from left to right and back to front.
2) Lay floor of shed onto the timber bearers. The runners under the floor should be at right angles to the timber bearers. Check that the floor is level.

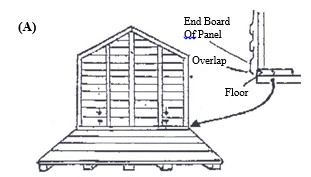
3) (SEE FIG. A) Erect back gable end. Ensure that end board overlaps and is flush with floor before securing with nails. All wall panels have a board at thebottom that overlaps the floor.
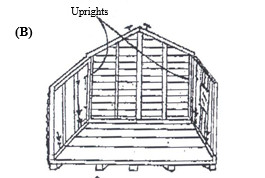
 4) (SEE FIG. B) Now attach side walls to gable by nailing the uprights to the gable first and then nail to the floor. A side with windows can be put on either the left or the right hand side.
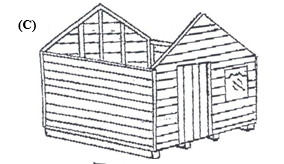
 5) (SEE FIG. C) Fit door section only when end gable and side walls are fully secured. Again nail to the side sections first and then to the floor.
 6) (SEE FIG. D) Place two nails at each apex of roof – one nail at each side of the point. Place roof sections in place, hanging them on these nails joining at the apex. Make sure roof sections are the correct way up. The lower parts of the roof are felted. Before nailing, make sure the roof pieces are square to the shed using the nails to manoeuvre the roof. Nail to the points of the gable section. Nail the roof to the sides of the shed from the inside. If the shed has a roof overhang make sure it’s at the front of the shed. Place strip of felt on top of roof, nail down and secure underneath.
7) (SEE FIG. D) Nail on facia boards over felt on gable ends, corner slips to cover joints and window slips to secure glass


